»

Friday, September 20, 2013

Dollar Tree Pumpkin Topiary

Hey Everyone!

I went to Dollar Tree last week and saw they have all their fall stuff out! I love it, I get so many ideas for crafting there. Since everything's a dollar, I don't feel bad buying stuff to craft with there in case it gets ruined. Although, this time I literally almost passed out from how much I spent, it's the MOST I've ever spent at Dollar Tree. I won't even tell you how much, but it was under $50, not by much though!

Anyways, here's the Topiary I made to go in the urn outside my front door.

I LOVED how this turned out! I just took glue to make the numbers and then put copper glitter over the glue. Then I just hot glue gunned the pumpkins together, tied some rafia around them, and hot glued leaves/flowers to the pumpkins. 

The next part is going to seem weird, but I forgot to get Styrofoam at the store to use to make an arrangement (and actually this turned out much better I think). I looked around my house to see what I had to use, this is what I found! 


I took a plate, put some rocks on it, and hot glued the styrofoam bowl on the top. Then I took dollar tree leaves and glued them all over the outside of the bowl and the plate. Then I hot glued the flowers and other fall stuff on it. The best thing, EVERYTHING was bought at dollar tree (Except the plate/bowl/glitter/rafia.. but I'm sure you could buy those there too!). I would say this cost around $8.00. 

And with the stuff left over, I made this!


I love fall!! :) 

Enjoy!

Thursday, September 5, 2013

Glitter Wall

Hey Everyone!

I am finally working on my dd room! Her room is damask and pink. So we started with paint. I knew I wanted a pink wall, but not only a pink wall-- a pink GLITTER wall!

I used one packet of the Valspar Glitter Crystals, I think they were around $7.00, in 3/4 of the gallon of paint. I didn't want the glitter to be overwhelming. I think it turned out perfect. It's hard to capture the glitter in the pictures, so I took a few. The tape is still on the wall--ignore that! :)


The paint I used was the Valspar Ultra Paint + Primer. I also tried something I saw off pinterest, using aluminum foil in the paint tray to keep it clean! Just a note, throw the aluminum foil away after one use. The dried paint will come off onto the roller if you use it again. I needed two coats for this wall.. so I found this out the hard way!


And FYI, I tried using fine glitter in some paint on another wall, totally did not work. I'm not sure what's special about the Valspar Paint Crystals, but you'll have to use them if you want glitter paint. I've also seen on pinterest where they mixed glitter and glue, not sure how that would work out. 

Enjoy!

Thursday, August 22, 2013

Damask Light Switch/Outlet Covers

Hey Everyone!

I'm in the process of completing my daughter's room. Her room will be damask and pink. I have been buying stuff left and right for it and now it's time to actually start creating stuff! I can't remember where I got the idea for this project, I actually think it was off Etsy. (There was NO way I was going to pay $10 for a custom light switch cover!) 


I love the way they turned out. I used Tombo and a glue/water mix to attach the paper. I will be spraying them with this sealer. Although, I have it in matte finish so i'll be buying it in gloss. These were super easy and REALLY cheap. Considering the sealer is only $3.98 and the paper was on sale for $.30. You can use your existing light plate covers. I did make 6 of these and used 1 piece of 12x12 paper and had a little left over. (I would suggest cutting the paper 5 1/4 in x 3 3/4 in for both these.) I bought the paper at Hobby Lobby when it was on sale for 50% off, of course!

Also, you'll want to paint the screws that you'll be using too. Don't forget this part, having bright white screw heads with these covers would not look good. I'll be painting mine black with spray paint. 

Good luck! :)


Wednesday, August 7, 2013

Crew Socks = Baby Leggings

Hey Everyone!

On my last post I made Baby Leggings with knee high socks. This time I'm going to show you how to make them with crew socks. I do prefer the knee high socks, but sometimes I find super cute crew socks! The best thing is, the crew socks were in packs of two for $1.00, so they ended up being $.50 a piece! So let's get to it!

Here's the crew socks (Along with one of the knee high socks) that I bought at Dollar Tree.

1. Turn the sock inside out and put the heel of it like this. You'll want to put both sides of the heel together and sew them. I know I'm not explaining this good, I'm not sure how to better explain this!


2. Sew the heel.


3. Cut the heel part off, making sure not to cut over your sewed line.


4. Keep the sock inside out and go to the toe area. Cut off a little bit of the top. DON'T cut the whole toe area off. I cut above that line.


5. Fold down about 1/4 of an inch and sew.


And here they are finished. The line where I sewed the heel doesn't really bother me because I put them on to where it hits behind the knee. You can't really see the line.

The baby is sleeping now or I'd take a picture and show you!

Good luck!

Thursday, August 1, 2013

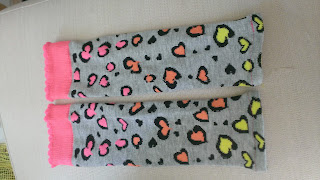
1 Dollar Baby Leggings, Yes Please!

Hey Everyone.

So since I became a stay at home mom, I've been doing a LOT more craft projects. My DH laughs every time I start a sentence with, "I saw this on Pinterest..."

I've also become a lot cheaper, since going down to one income. So when I saw baby leggings on the internet, I fell in love with them! The ones that I loved were $10-$12, which wasn't bad.. but I knew I could make them since seeing something like this. (On Pinterest of course!)

While shopping at Dollar Tree tree, I saw they had packs of knee socks for $1.00 (of course!). So, I bought one of each. They also had two packs of crew ones for $1.00 (I bought those too!). The crew ones are a little harder to make.. I'll make a tutorial later! Since it's back to school time, I believe they're stocking these cute socks right now!

So here's the tutorial!


1. Cut the sock above the heel part. This only works for KNEE SOCKS. If you're doing crew socks, they're going to be too short. Don't worry, I'll post a tutorial for those later.. sometime.


2. Turn the sock inside out and pin a little less than half an in. around. I'm not sure how to better explain this, just look at the picture below. Make sure you pin it though- trust me. When I made my first pair for the 4th of July, the sewing was not straight at all.


 3. Sew it. It helps to pull it tight when you're sewing it.


4. Turn it inside out again! Ta Da!! Baby Leggings!!


Here they are on my baby! I had to put her on her stomach because she kept moving her legs on her back. Ignore her outfit. I just wanted to show you how they looked on a baby.


Good luck! :)

Tuesday, June 18, 2013

Rocking Chair Makeover!

Hey Everyone!

I've been away for a while, having a baby.. ya know! She is 11 weeks and amazing. We did not decorate a room for her before she came because we have a huge master bedroom. I figured she would just sleep with us in our room. Right now she has a nice little set up of her dresser (which is also her changing table!) and her crib. So I have been designing her room in my head for a while now! I knew that I wanted her room to be black and white damask with hot pink, so here is something that will go in her room. Creating her room is going to take a while, she's going to be in our room for at least 3 more months (I think!), so I've got time!

Anyways, here is the first installment of my DD's room! Her rocking chair. In the beginning, we decided not to get a rocking chair because I didn't want to spend the money and I think they are not useful after the first year or so. We opted for a rocker/recliner in our living room, which I use everyday. Anyways, when I saw this rocking chair on a website for $5.. I KNEW I needed it for her room! It was only $5 right?! Here's a picture of it...

Not very appealing.. but the wheels in my head had already started cranking with design details! So after a whole weekend (I told my DH that I was going to finish this project in a weekend), it is finished!

Without Further Adieu....


Looks much better right?!?! I made a pillow too because I had extra fabric left over! I love the way it turned out. I cannot wait until I finish her room!

The cost break down was...

Chair- $5
Spray paint- $13
Primer- $0 ( I already had it)
Fabric 2 yards- $15
Ribbon- $2
Pink trim 2 yards- $4
Foam :| (Because my dog decided to rip part of it apart....)- $17
Buttons- $4
Needles to put the buttons through the foam- $5
Upholstery thread- $2
Final cost- $67 (Can't beat that for a custom chair!!)

Friday, October 26, 2012

Pumpkin Doughnut Muffins

Hello Everyone!

Long time no see :).

Thought I'd post a recipe today for Pumpkin Doughnut Muffins. My DH's reaction when I told him I was making this, "How can it be a doughnut if it's a muffin?"

Oh just wait!

**I will tell you that these aren't as sweet as most muffins, so the extra cinnamon/sugar topping is great. I also only put the cinnamon/sugar and butter on the top of the muffins. And I also used Pumpkin Pie spice instead of just cinnamon.


Pumpkin Doughnut Muffins

adapted from Everyday Food
Print Recipe

3 cups all-purpose flour
2 1/2 teaspoons aluminum-free baking powder
1/4 teaspoon baking soda
1 teaspoon salt
1/2 teaspoon ground cinnamon
1/4 teaspoon grated nutmeg
pinch of ginger
pinch of cardamom
15 ounce can pumpkin puree
1/3 cup buttermilk
1 teaspoon vanilla
10 tablespoons cool unsalted butter
3/4 cup brown sugar
2 large eggs

3/4 cup granulated sugar
2 1/2 teaspoons ground cinnamon (Or Pumpkin Pie Spice, probably only 1 1/2 -2 tsp)
4 tablespoons unsalted butter, melted


Preheat oven to 350. Butter and flour a standard 12 cup muffin pan.

Whisk together dry ingredients in a medium bowl. Whisk pumpkin, buttermilk, and vanilla in a small bowl.

Cut butter into tablespoons and beat until smooth. Add brown sugar and cream until light and fluffy, about five minutes. Beat in eggs, one at a time, until blended, scraping down the bowl as needed.

On low speed, alternate adding flour and pumpkin, beginning and ending with flour in 3 batches, until just combined. With a spatula, give the batter a couple of good folds to ensure all of the flour and pumpkin is incorporated.

Divide the batter between the muffin cups. Bake 28-32 minutes, or until an inserted toothpick comes out clean. Cool in pan on wire rack for 10 minutes.*

Combine granulated sugar and cinnamon in small bowl. Melt butter and brush over warm muffins. Roll muffins in cinnamon sugar. Store in airtight container up to 1 day. (I melted the butter in a small dish and dipped the top of the muffins in it and then dipped them in the pumpkin pie spice/sugar mixture.)

*To freeze, cool muffins completely, then freeze up to 3 months. Reheat about 10 minutes in 350* oven, then brush with butter and roll in cinnamon sugar.

Good luck and happy eating!!!